-1.png?width=151&height=28&name=Traact_Logo_Blue%20(1)-1.png)
Contracts Page
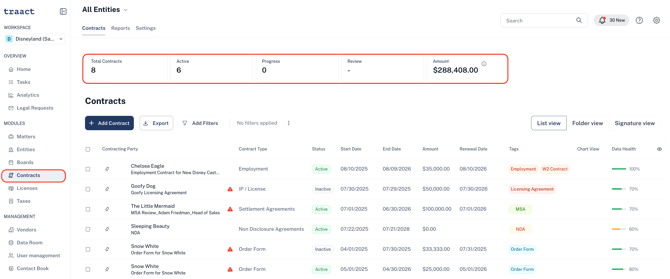
The Contracts Overview Tab displays all contracts linked to your workspace. You can filter contracts by selecting a specific entity from the main dropdown menu.
From this page, you can view:
-
The total number of contracts in your workspace (or for the selected entity).
-
The number of active vs. in-progress contracts.
-
The total value of the selected contracts.
Additionally, you can:
-
Create new contracts.
-
Export the Contract list.
-
Filter contracts by Entity, type, status, start/end dates, amount, renewal date, collaborators, and custom fields.
Note that the Entity Filter is located on the top of the screen, where you see the default selection of “All Entities.” All other filters are found below the contract amount analysis.
Contract View
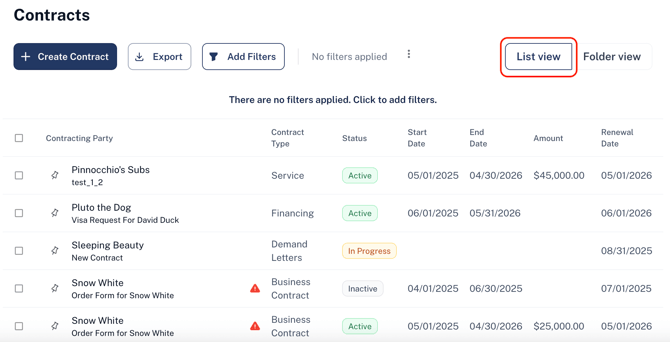
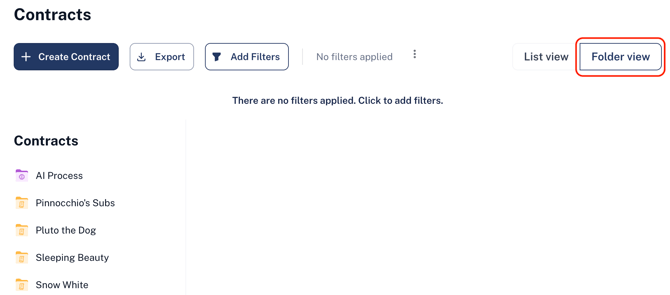
On the top right side of the page, you can also select either a List or a Folder view of the Contracts.
List View
Folder View
Contract Creation
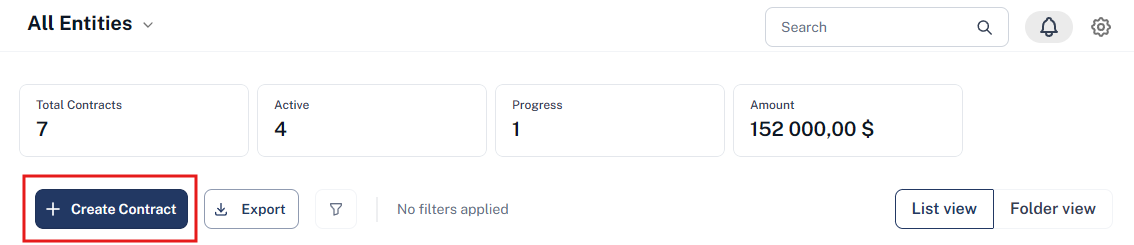
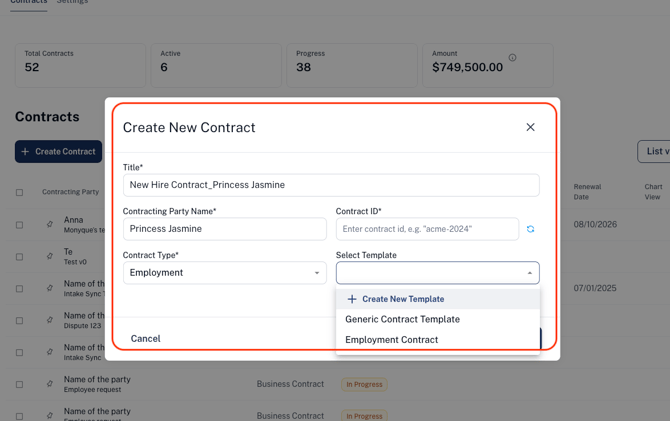
Step 1: Click on '’Create Contract',' and you will be taken to the contract creation page;
Step 2: You will be asked to select the Contract Type and the Contract Template you'd like to use as well as add some basic information about the contract details.
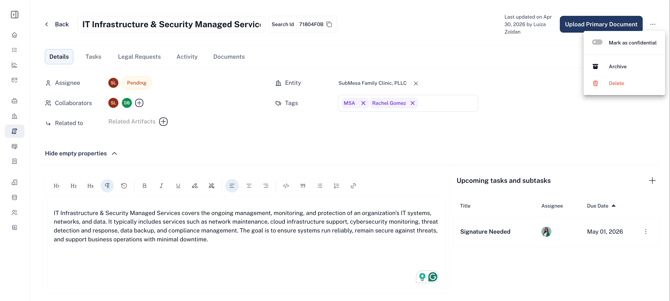
Step 3: On the top of the screen you have the option to enter the Contract's basic details;
-
Contract Name: You can add the Contract name according to the desired naming convention.
-
Assignee: Choose who will be the user responsible for following up on this contract. There can only be one assignee.
-
Entity: You can select which entity you want to link the Contract to.
-
Collaborators: Choose which users will be collaborators on this Contract. You may select multiple Collaborators.
-
Tag: By using tags, you can add Terms that can be used to filter and group your Contract Artifacts.
-
Description: You have the option to add more details to your Contract, like a summary or additional information needed in the Multi-line text box field.
-
Related To: You may select any artifact in your workspace to link to this contract.
-
Mark as Confidential: By clicking on the three dots on the top right of your Contract page, you can mark a Contract as Confidential, which means that only assignees and Collaborators will be able to view it.
-
Archive: Under the same three dots, you can also archive a Contract that no longer requires management.
-
Delete: If a contract was created by mistake, you may also delete it from the same pop-up menu.
Note that there is no "Save” option. The information you enter is automatically saved by the platform.
Step 4: Fill in all the details accordingly for easy visibility of the contracts’ basic information;
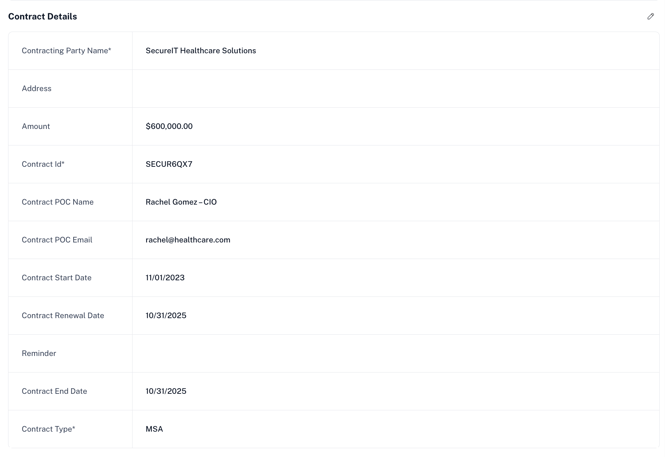
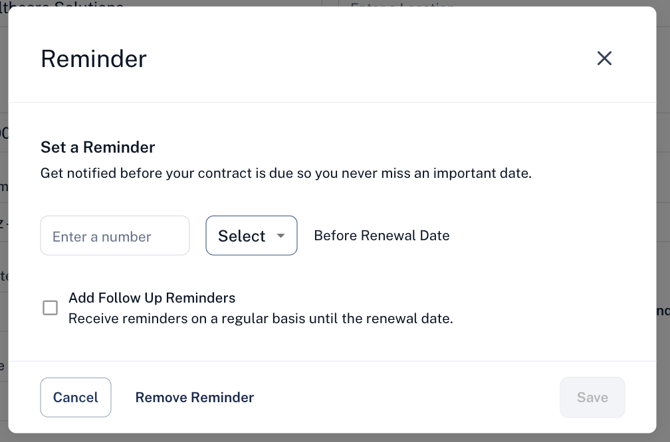
Add a Contract Renewal Reminder
You can configure a Contract Renewal Reminder to automatically generate a task on a specified date.
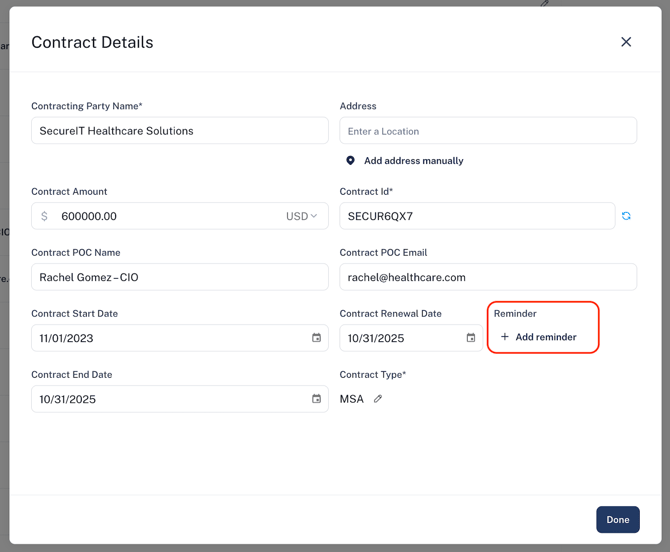
Additionally, the system will send reminder notifications via email and in-app alerts on the selected days of the week.
Super Lawyer (AI) to Enter Contract Details
Contract details can be entered manually or using the AI Assistant.
To use the AI Assistant, follow the workflow below:
-
Go to the Contracts Page.
-
Select "Add Contract"
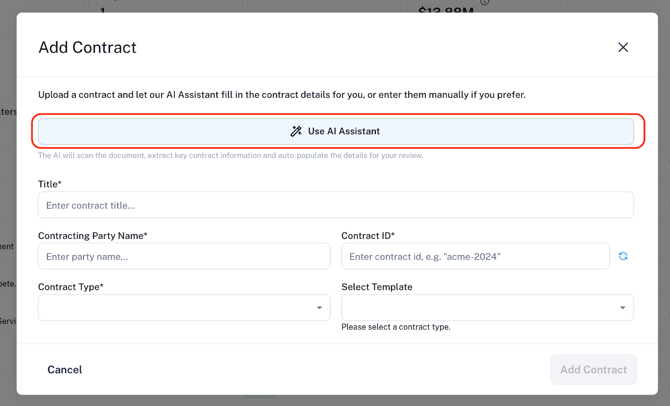
3. Click on "Use AI Assistant" and upload your document;
4. Select "Add Contract";
5. Once the recommendations are made, click on "Continue";
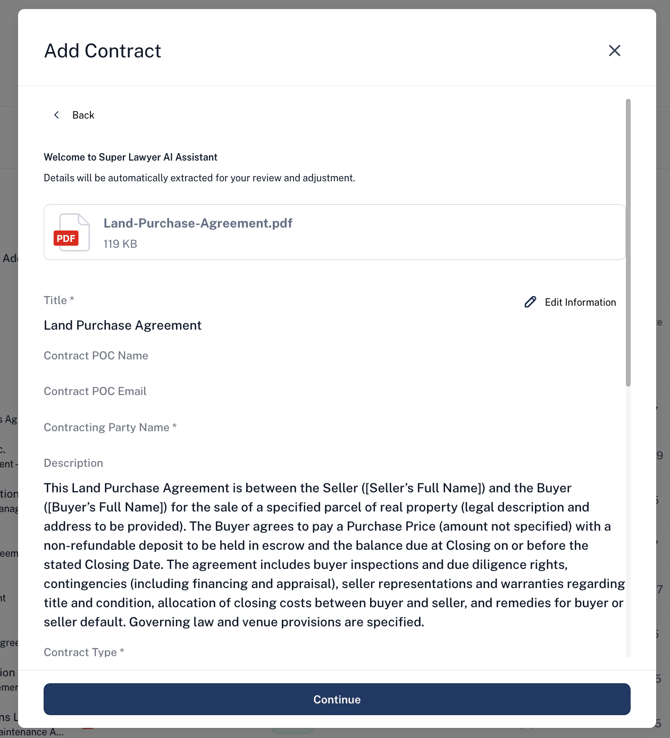
Note that AI is only about 80% Accurate; therefore, the information needs to be reviewed and corrections may need to be made. Additionally, this is a paid feature, with the cost per document specified in your Purchase Order.
If you would like to upload a document without using AI, simply complete the workflow described above from 1 through 2.
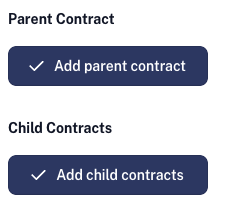
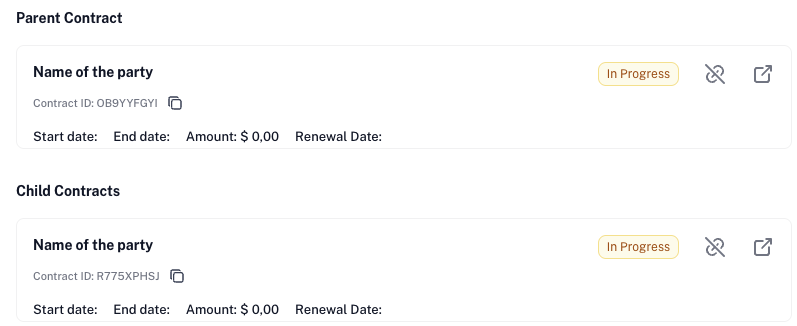
Step 5: Designate a Parent or Child Contract.
You can establish connections between contracts by marking one as a Parent Contract or a Child Contract. This allows you to organize and track related agreements.
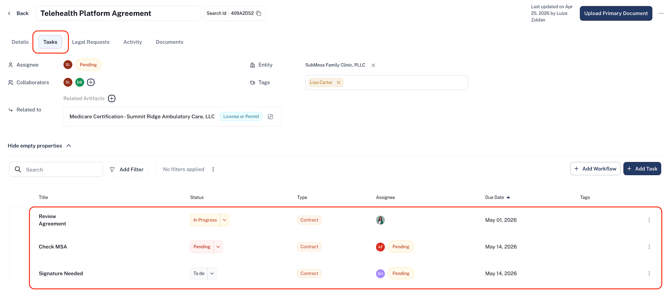
Step 6: You may also create Tasks or Apply/ Create a Task Workflow that is connected to your Contract. It allows you to distribute the responsibilities and steps related to Contract Management. You may find more information on how to manage a Task Template in the following link: How to create a Task Workflow.
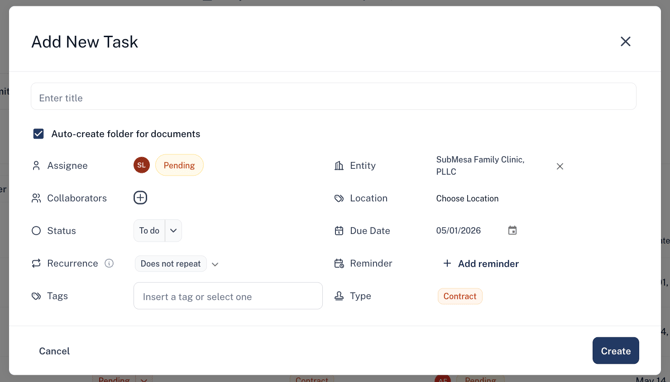
In order to add a task. Click on "Add Task", fill in the task name/description, assign it to a person (if necessary), set a due date, and define status;
How to Create or Edit Templates
To streamline your workflow and reduce manual input, each contract type includes up to 10 preset templates. These templates are fully customizable—you can modify existing fields, remove unnecessary ones, or add new fields based on your needs.
Step 1: Access the Contract Module and go to “Settings”.
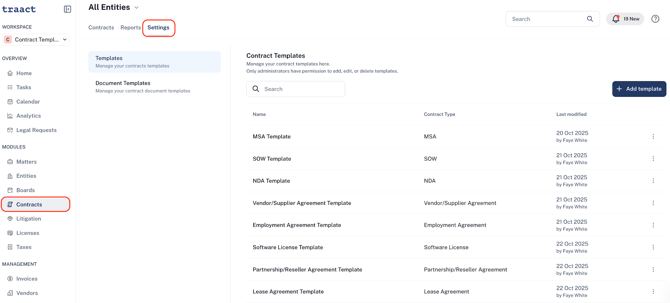
Step 2: Locate the template you would like to modify. Click the three dots on the right side of the template row to view available actions:
-
Edit
-
Hide
-
Delete
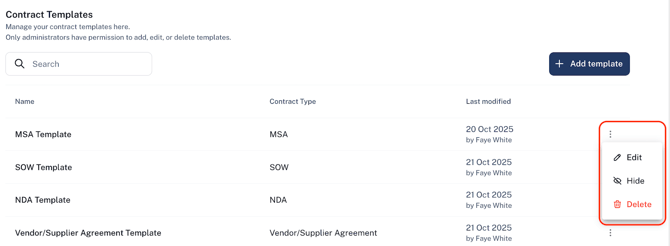
Step 2A: Select Edit
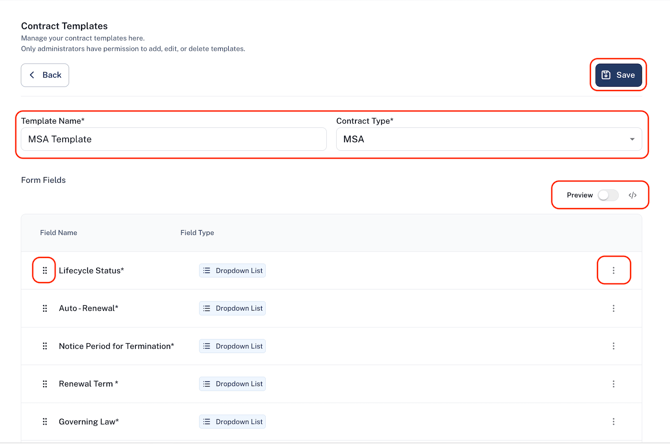
When selecting Edit, you can fully customize the template:
-
Update the template name and assign or modify the associated contract type.
-
Click Preview to see how the template will appear to users during completion.
-
Click the three dots next to any field to Edit, Hide, or Delete it.
-
Use the controls on the left side of each field to reorder them within the template.
-
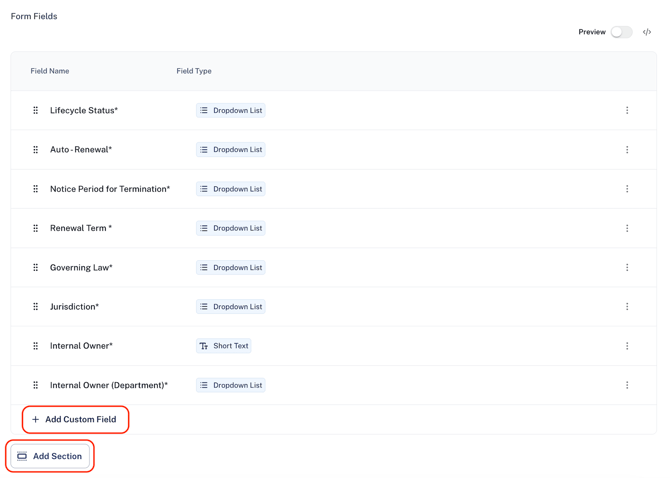
Scroll down and click Add Custom Field to include any additional information relevant to the contract type.
-
Select Add Section to organize fields into logical groups (e.g., Personal Information, Professional Information).
Step 2 B: Select Hide
Select Hide if you want to remove the template or field from view without permanently deleting it. Hidden items can be restored later if needed.
Step 2C: Select Delete
Select Delete to permanently remove the template or field. This action cannot be undone.
Step 3: Be sure to click Save after making any changes to ensure your updates are applied.
Step 4: Navigate back to the main Contracts page
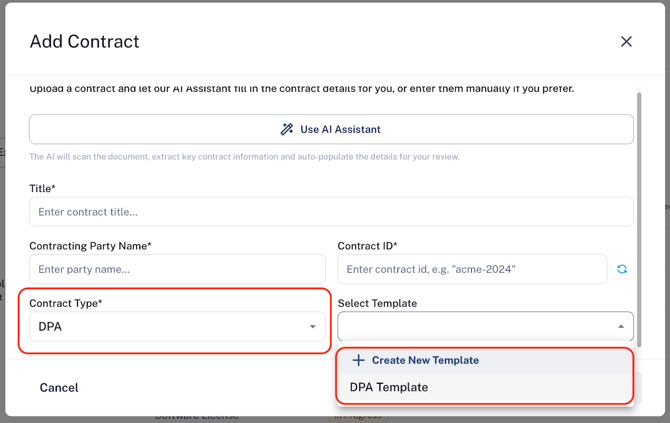
Step 5: Click Add New Contract
Step 6: After selecting the Contract Type, the available templates for that type will automatically appear for selection. Choose the template that best fits your needs to proceed.
How to Generate a Contract Using Pre-Set Templates
Creating standardized, auto-populated contracts is simple and efficient with Traact's contract template functionality. Follow the steps below to generate contracts using Word templates and dynamic fields.
Step 1: Access the Contract Module and go to “Settings”.
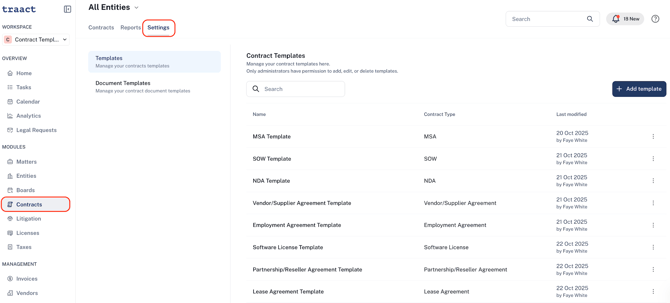
Step 2: In the Settings section, upload your contract template in Word (.docx) format. This template will be used as the base for generating contracts with pre-set dynamic fields.
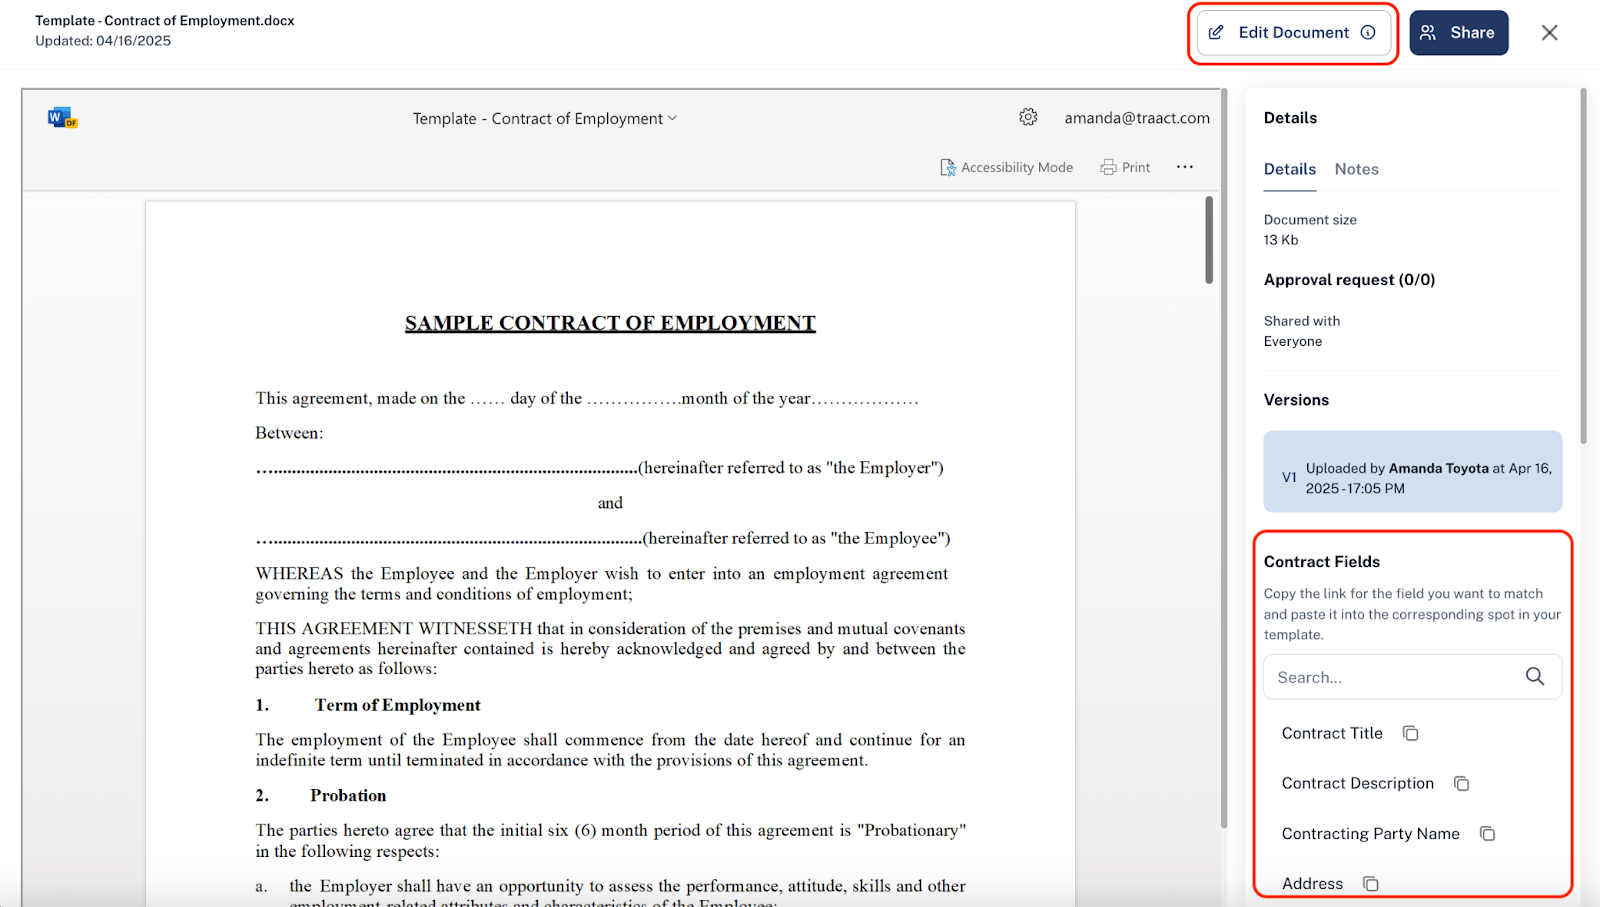
Step 3: Once your template is uploaded, open the Word document and select “Edit Document.” This will open the template in a new tab.
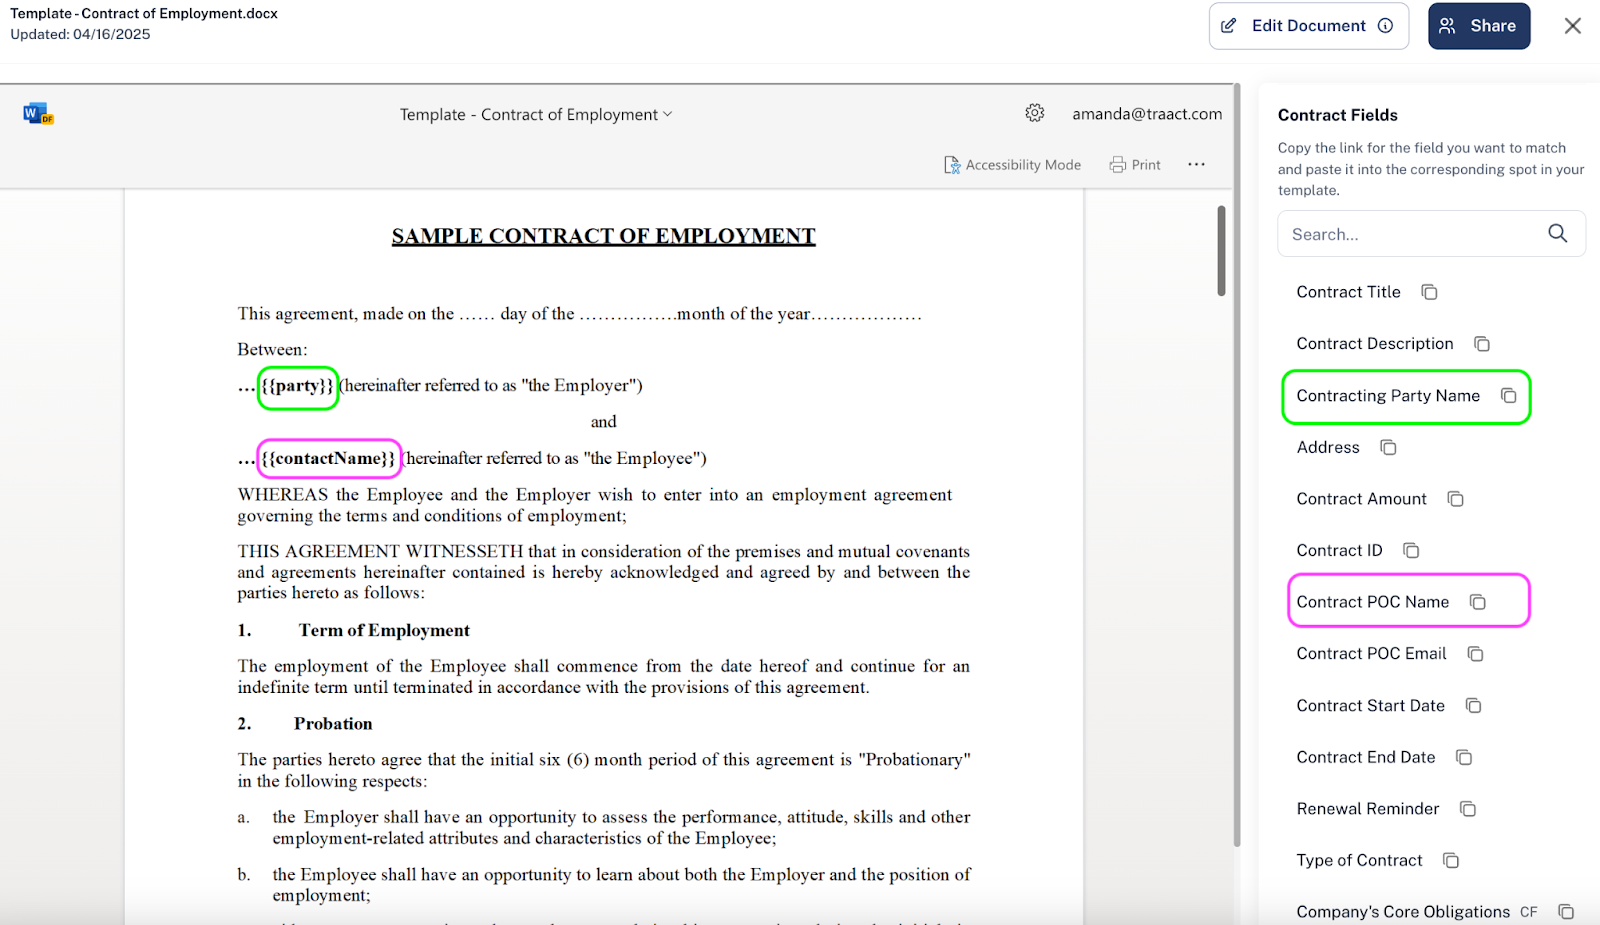
On the right-hand panel, you will see the “Contract Fields” section, which lists pre-configured field codes. These codes automatically pull data from contract attributes, including custom fields, and populate the template when generating a contract.
Step 4: Copy and paste the relevant field codes directly into your Word template at the desired placeholders (e.g., employee name, contract date, term, etc.). The system automatically saves changes when you close the editing tab.
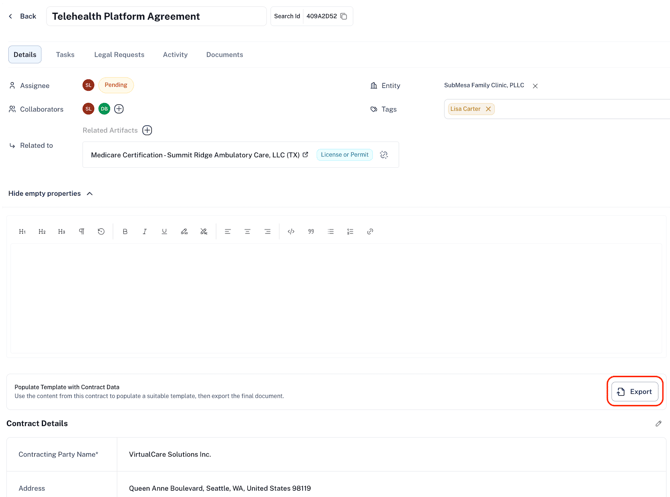
Step 5: Navigate to the Contracts module and open the contract you want to generate. Ensure all required fields are completed.
Scroll down and click “Export.” From there, select the template you previously uploaded in Settings. The system will automatically populate the template with data from the contract record.
Step 6: Finally, the final document will be downloaded as a Word file, ready for use!
Contract Identifiers
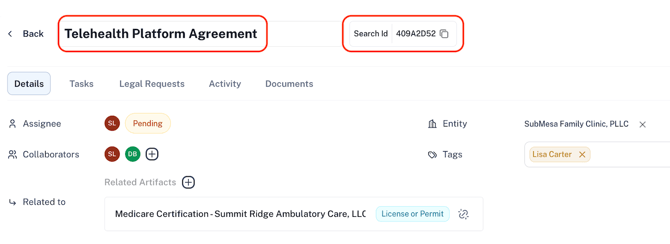
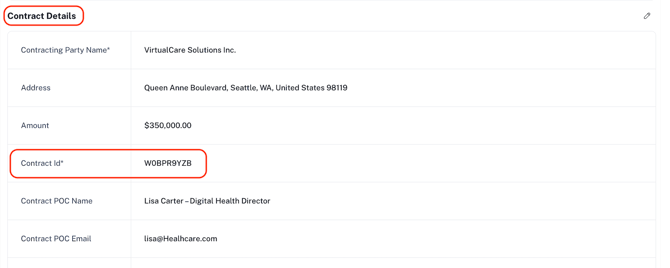
You can track your contract within the platform using the four identifiers below: Contract title, Search ID (Automatically generated), Contracting Party Name, or Contract ID (Automatically generated)
Activity
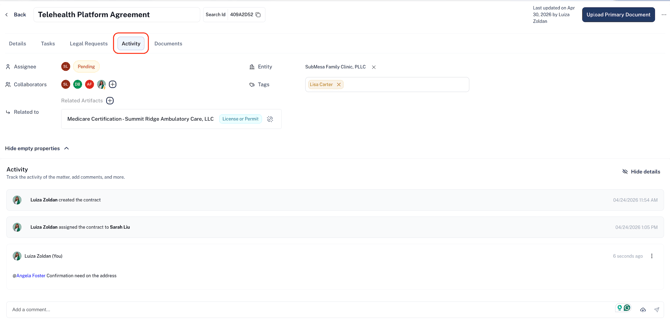
Click on the activity to view the entire history involving this contract. In this feature, you can also communicate with other collaborators and contact Traact support.
Note that in the right corner of the Activity page, you may hide the details, which will leave only the comments displayed.
Invoice
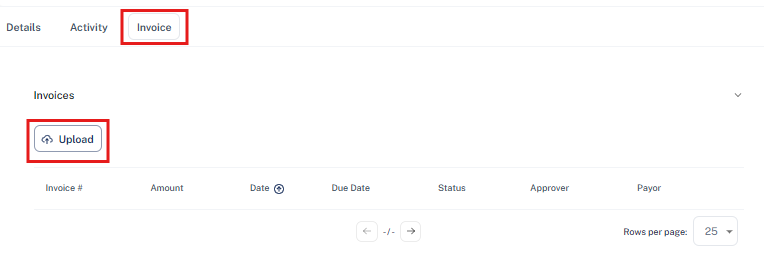
If you have signed up for the Invoice module, you are able to generate Invoices directly through the Invoice tab in Contracts. You can find more details into Invoice Management in the following link: How to Manage E-Billing.
Custom Contract Type
Users can create their custom contract types. In order to create, simply select the "+ Create new type” option on the Contract Type field dropdown, and the following window will pop up:
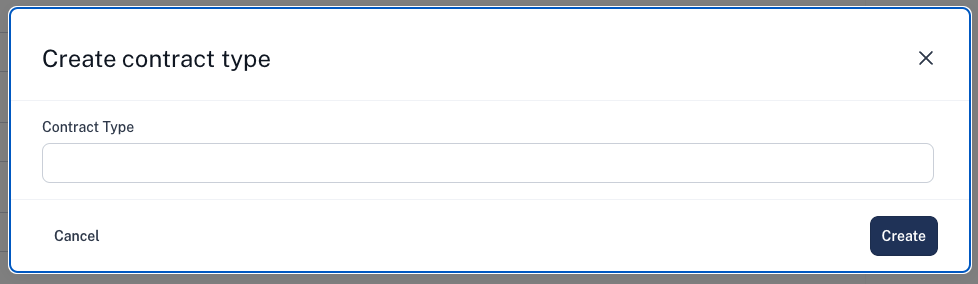
Once you have entered the information, simply click on "Create. ” That type will be added to your dropdown and can be always used from that moment on.
Microsoft Office Document Reviewing
Upload Microsoft Office documents for review in real time. You can also add comments and track previous versions.
Please note: The user's individual permissions given in the "User Management" module will override any permissions given in the contract review.
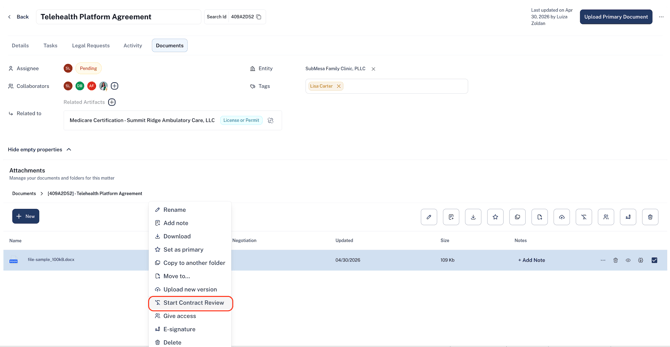
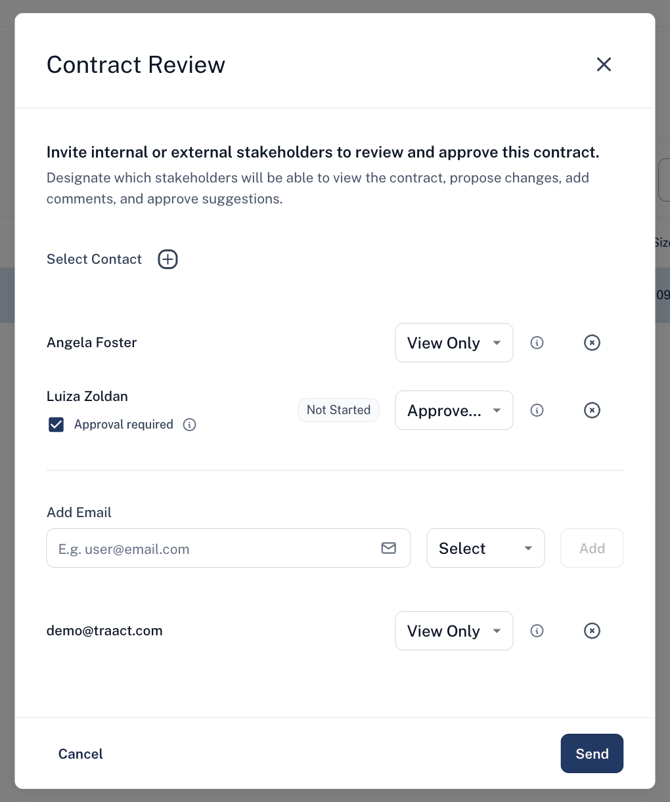
Step 1: Select "Start Contract Review"
Step 2: Select contacts already in the platform or add external users:
a) View Only 1: Users with View Only Contracts Permission + View Only in the Contract Review can only visualize the versions of the document, but not edit or make any suggestions.
a) View Only 2: Users with Edit Contracts Permission + View Only in the Contract Review can make suggestions and recommendations, but not edit the document.
Once selecting "Review Contract", the user will be able to add, delete, and make edits that will be displayed as suggestions in the comments on the right.
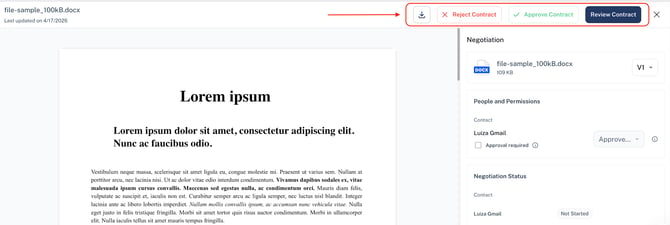
Once all suggestions are made, the user may "Propose Changes" or "Leave Review Mode", not saving the suggestions made.
Please note that once you propose the changes, you cannot make other suggestions. Proposals only store one version.
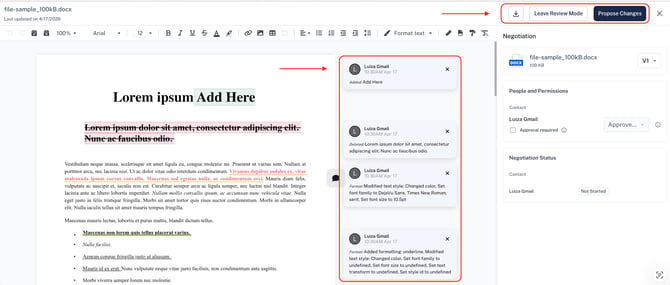
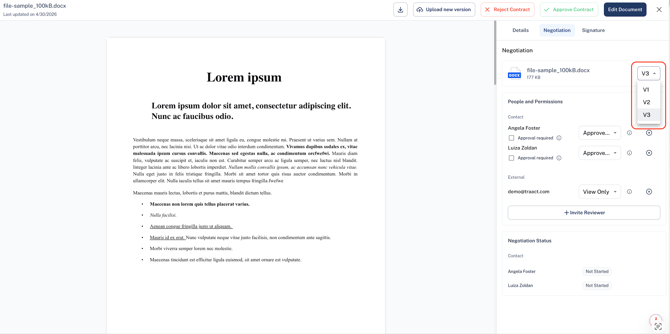
b) Approve/Suggest and View Only: Users with Edit Contracts Permission can make any edits to the document. Any edits made will be saved as a new version of the document displayed on the top right of the screen.
Send Contract for e-Signature
Our integration with HelloSign allows users to send any documents for e-signature in Traact.
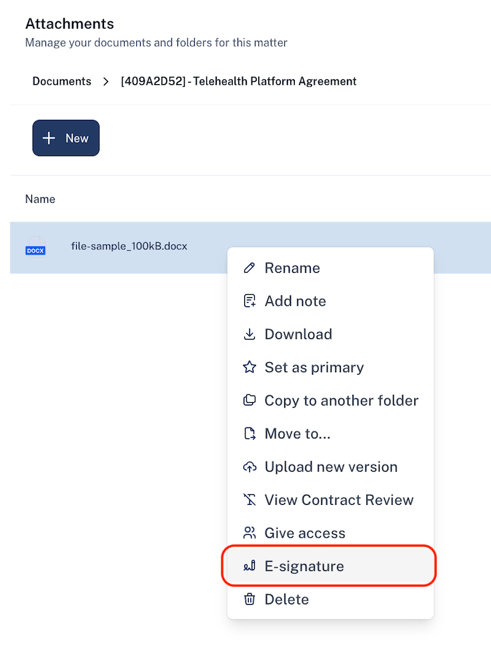
Step 1: Right-Click on your document;
Step 2: Select E-signature;
Step 3: Add the name and email of the signers;
Note: If you wish to receive notifications on when the document was signed by either party, make sure you select the box "Notify me about this document."
Step 4: Add the email of the people you wish to be cc'ed on all notifications regarding the signature of the document;
Step 5: Once completed, select "Continue" and follow all steps displayed and officially send it for signature
Communication via the Activity Tab
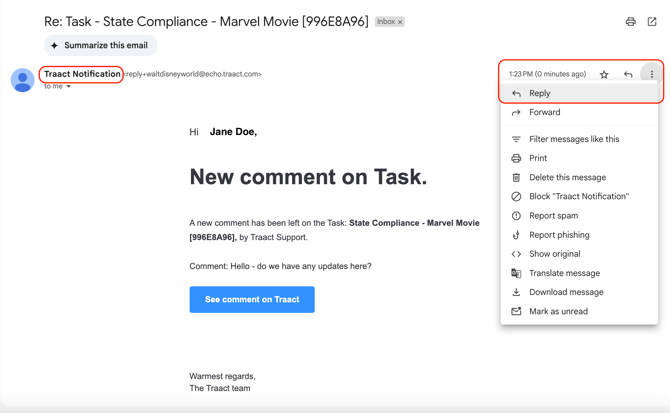
The Activity tab serves as a central hub for internal communication between Traact users across all modules. When a message is posted in the Activity tab, an email notification from "Traact Notification" is automatically sent to all assignees and collaborators tagged in the relevant artifact, task, or matter.
To respond, you can simply reply to the email notification, and your response will be recorded directly in the Activity tab within Traact. Alternatively, you have the option to reply directly within the Activity tab if preferred.
Need Help?
If you have any questions or need assistance with a request, please contact your Customer Success Manager or reach out to the Traact Support team.