---
title: "How to: Create and Manage a Board Meeting"
description: "How to: Create and Manage a Board Meeting"
---
[Skip to content](https://help.traact.com/en/articles/10088328-how-to-create-and-manage-a-board-meeting#main-content)
English
Show submenu for translations
-1.png?width=151&height=28&name=Traact_Logo_Blue%20(1)-1.png)
- [Traact Website](https://www.traact.com/)
Open main navigation
Close main navigation
- [Traact Website](https://www.traact.com/)
- English
Show submenu for translations
- [Contact us](mailto:ops@traact.com)
[Contact us](mailto:ops@traact.com)
Traact Help Center
- There are no suggestions because the search field is empty.
1. [Traact Articles](https://help.traact.com/?hsLang=en)
2. [Modules](https://help.traact.com/modules?hsLang=en)
3. [Board Management](https://help.traact.com/modules?hsLang=en#board-management)
# How to: Create and Manage a Board Meeting
## In this article, you will find a detailed step-by-step guide for adding boards. This guide will lead you through each phase of the process, highlighting key details and requirements to ensure a smooth setup. By the end, you'll be able to create and manage boards effectively, helping you to better organize tasks and streamline your workflow.
---
### **Steps to Add a Board Meeting**
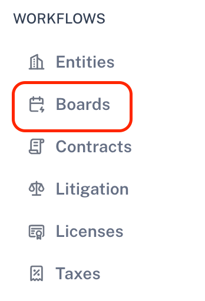
**Step 1:** From the main menu, select the Boards module;
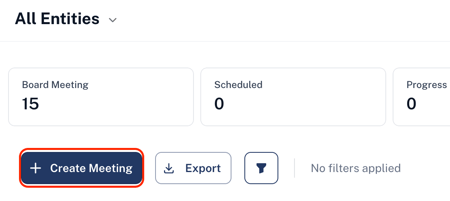
**Step 2:** On the Boards page, click on “+ Create Meeting” to start a new board meeting;
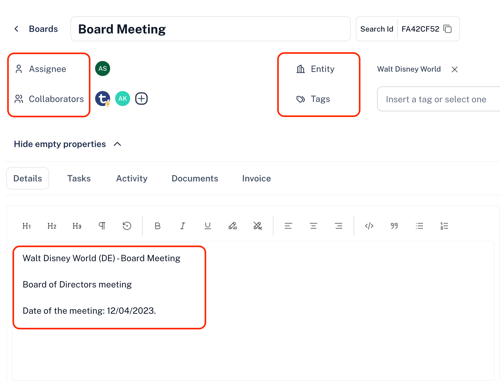
**Step 3:** You’ll be directed to the board setup page. Here, you can enter the following details:
- **Assignee & Collaborators:** Assignees and collaborators are existing contacts within your workspace;
- **Entity:** If the board is related to a specific organization or entity;
- **Tags:** Optionally, add tags to categorize or filter boards. You can either choose an existing tag or create a new one;
- **Description:** Provide a brief description of the board to clarify its purpose.
**Step 4:** Define Board Properties. You will now be prompted to set various board properties such as tasks, activity, documents and invoices.
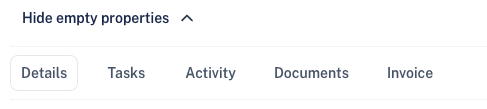
- **Tasks:** This section allows you to create tasks within the board.
1. Click on “Tasks” to create tasks for the board;
2. Select “+ Add Task” to create a new task, or choose “+ Apply Template” to use a pre-built task template.

- **Activity:** This section allows you to communicate within the created board meeting.
1. Click on “Activity”;
2. Click on “Add Comment” to start a conversation. Use @ to mention someone, select their name from the list, and send your message;
3. You can upload reference documents by clicking the Upload icon;
4. To hide the conversation details and other details, click “Hide details”.
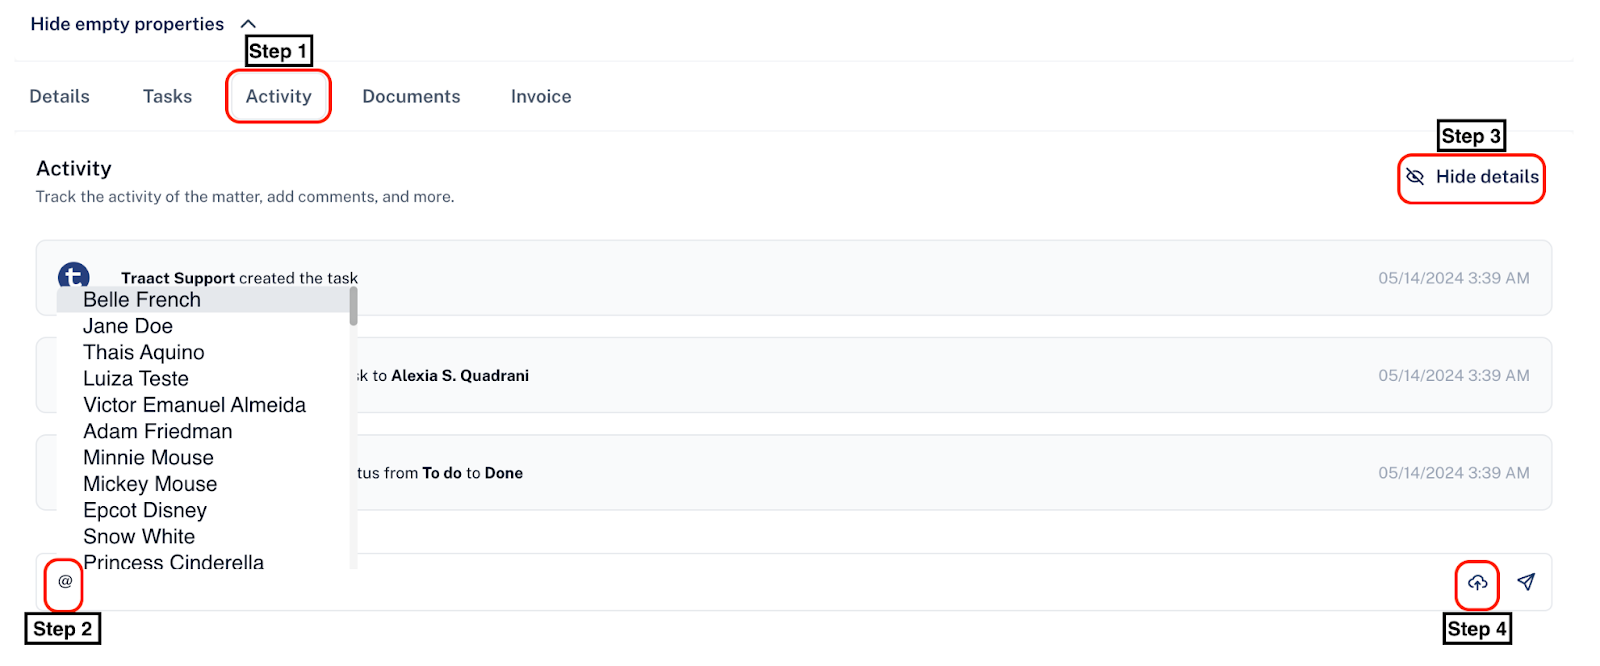
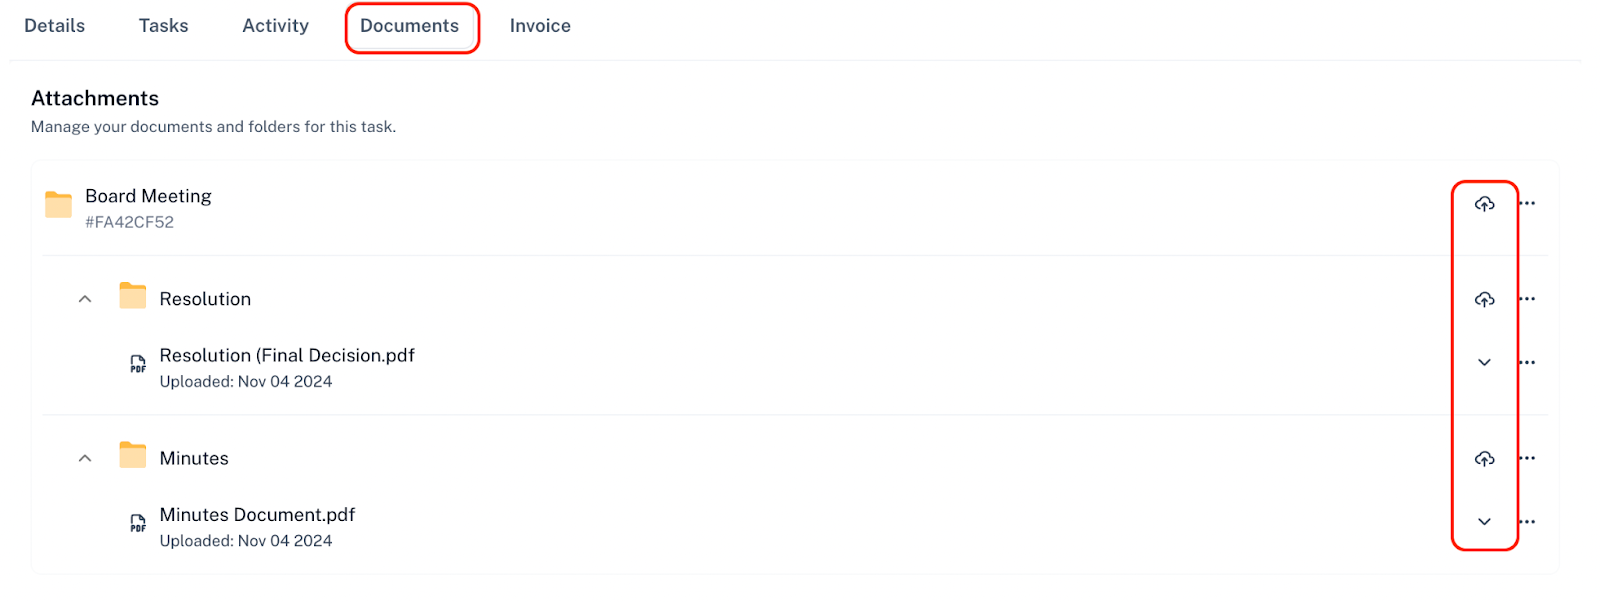
- **Documents:** Upload any relevant files to the board meeting by clicking the Upload icon or simply drag and drop files.
1. Click on “Documents”;
2. Upload any documents or simply drag and drop a file.
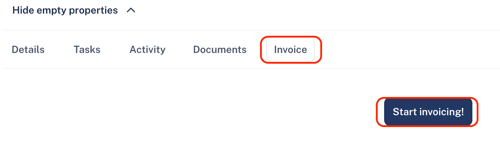
- **Invoice:** This section allows you to upload any invoice within the created board. Please note this feature is only available for workspaces which have access to the e-billing module.
1. Click on Invoice and select “Start Invoicing!” to add invoice details.
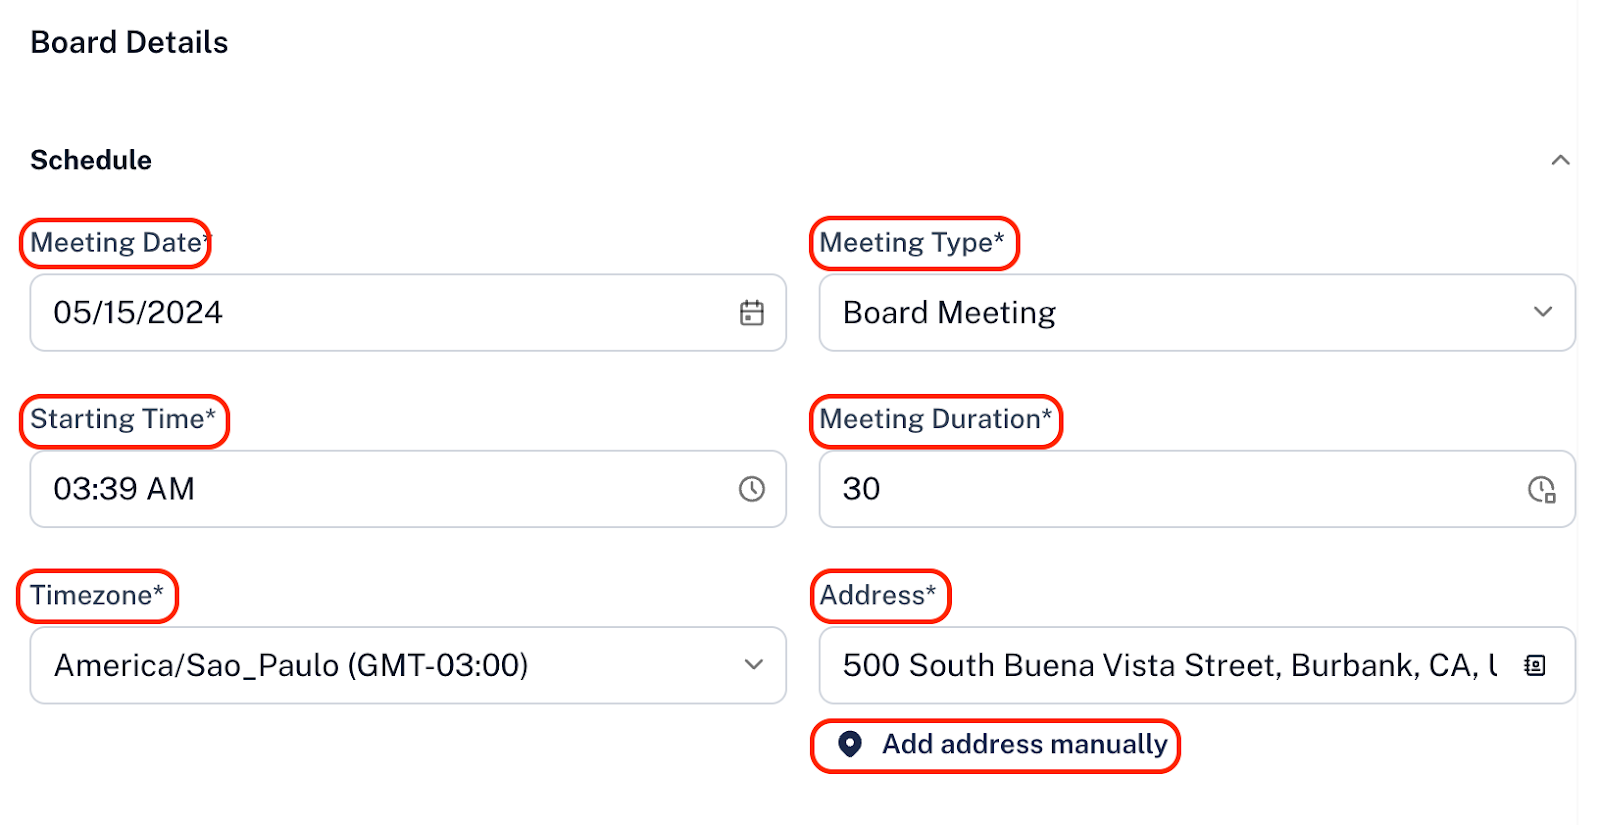
**Step 5:** After completing the board properties, scroll down to the“Board Details” section. Here, you’ll find fields for additional information, such as:
- **Meeting Date**: Choose the date for the board meeting.
- **Meeting Type**: Select the type of meeting (e.g., in-person, virtual).
- **Start Time**: Specify the starting time of the meeting.
- **Meeting Duration**: Set the meeting’s expected duration.
- **Timezone**: Choose the appropriate time zone for the meeting.
- **Address**: If it's an in-person meeting, enter the meeting location.
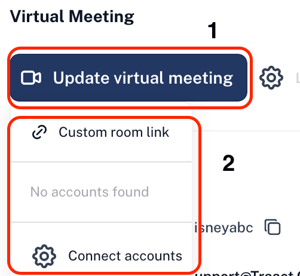
**Step 6:** Set Virtual Meeting Options. If the meeting will be virtual, scroll to the “Virtual Meeting” section. Here, you can:
- Add a custom room link, or
- Connect to a meeting platform like Google Meet or Zoom to generate a meeting link automatically.
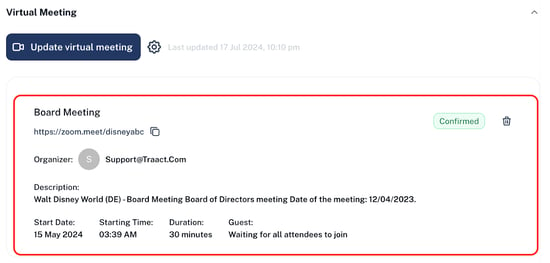
Once a meeting link is created, it will appear in the virtual meeting details.
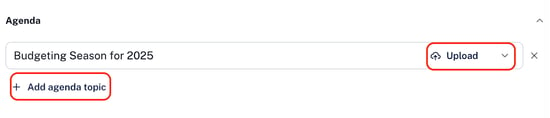
**Step 7:** After completing the virtual meeting details, you’ll find the “Agenda” section. Here, you can add agenda topics and upload documents;
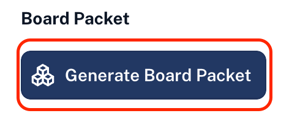
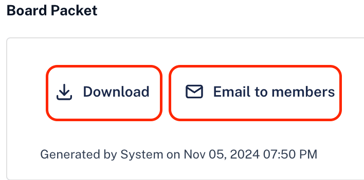
**Step 8:** As you scroll down from the Agenda section, you’ll find an option called “Board Packet”. Here, you can generate a comprehensive board packet with all the information entered above, and then choose to either download it or email it to members;
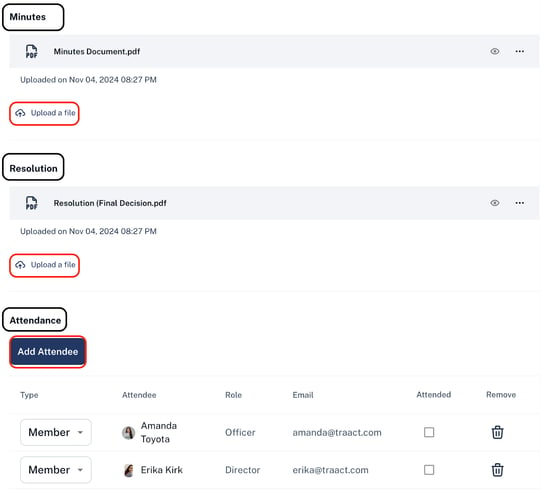
**Step 9:** Finally, after setting up the meeting, you can update various meeting details as follows:
- **Minutes:** Click the “Upload a file” to upload the meeting minutes after the meeting is held;
- **Resolution:** Upload the meeting resolution by clicking “Upload a file”;
- **Attendance:** Click “Add Attendee” to select invited meeting participants from your contacts.
---
---
### **Communication via the Activity Tab**
The Activity tab serves as a central hub for internal communication between Traact users across all modules. When a message is posted in the Activity tab, an email notification from "**Traact Notification**" is automatically sent to all assignees and collaborators tagged in the relevant artifact, task, or matter.
To respond, you can simply reply to the email notification, and your response will be recorded directly in the Activity tab within Traact. Alternatively, you have the option to reply directly within the Activity tab if preferred.
---
**Need Help?**
If you have any questions or need assistance with a request, please contact your Customer Success Manager or reach out to the Traact Support team.
- [Getting started](https://help.traact.com/getting-started?hsLang=en#main-content)
- [Access & Permission](https://help.traact.com/getting-started?hsLang=en#access-permission)
- [Integrations](https://help.traact.com/integrations?hsLang=en)
- [Modules](https://help.traact.com/modules?hsLang=en#main-content)
- [Board Management](https://help.traact.com/modules?hsLang=en#board-management)
- [Contact Book](https://help.traact.com/modules?hsLang=en#contact-book)
- [Contract Management](https://help.traact.com/modules?hsLang=en#contract-management)
- [Entity Management](https://help.traact.com/modules?hsLang=en#entity-management)
- [Home Page](https://help.traact.com/modules?hsLang=en#home-page)
- [Invoice Management](https://help.traact.com/modules?hsLang=en#invoice-management)
- [License Management](https://help.traact.com/modules?hsLang=en#license-management)
- [Litigation Management](https://help.traact.com/modules?hsLang=en#litigation-management)
- [Matter Management & Legal Request](https://help.traact.com/modules?hsLang=en#matter-management-legal-request)
- [Task Management](https://help.traact.com/modules?hsLang=en#task-management)
- [Tax Management](https://help.traact.com/modules?hsLang=en#tax-management)
- [Services](https://help.traact.com/services?hsLang=en#main-content)
- [How to](https://help.traact.com/services?hsLang=en#how-to)
- [Pricing](https://help.traact.com/services?hsLang=en#pricing)
- [Understanding Services](https://help.traact.com/services?hsLang=en#understanding-services)
- [Troubleshooting & FAQs](https://help.traact.com/troubleshooting-faqs?hsLang=en)
- [What's New](https://help.traact.com/whats-new?hsLang=en#main-content)
- [2024](https://help.traact.com/whats-new?hsLang=en#2024)
- [2025](https://help.traact.com/whats-new?hsLang=en#2025)
- [2026](https://help.traact.com/whats-new?hsLang=en#2026)
[-1.png?width=107&height=20&name=Traact_Logo_Blue%20(1)-1.png "Traact_Logo_Blue (1)-1")](https://www.traact.com/)
Manage. Comply. Move Forward
[mailto:ops@traact.com](mailto:ops@traact.com)
*Copyright © 2026,© 2025 Traact, Inc.*
*All rights reserved.*